
Component tests help us check that individual pieces of an application work as intended. For those tests to be useful, the test environment needs to provide the parts of the production environment that the components rely on.
I created UI Testing Setups From First Principles to expose the ingredients of a UI testing setup. Building it one layer at a time gives us a way to understand what UI code needs in order to run.
If you're curious about how UI applications are put together, or have struggled with a testing configuration that seems to work by accident, this is a useful exercise. We'll start with a small function and add what we need until we can test a React component.
What's Inside?
Start with the setup instructions, then work through these four steps:
- Test runner and assertion library: Run a test and check its result.
- Browser APIs in a Node test environment: Extend the testing environment by adding
jsdom. - Source transformation and module resolution: Prepare code and imports for the runtime that will execute them.
- Testing React components with Jest: Combine the layers to render a component and test its behaviour.
Note: This is a simplified breakdown for learning, rather than an exhaustive list of everything a testing setup might need. The aim is to build intuition for how these pieces work together.
Before You Start
The examples live in separate directories in the repository. Each has its own package.json, so install dependencies and run commands in the directory for the step you're working on.
git clone https://github.com/jovanmedford/ui-testing-explorations.git
cd ui-testing-explorations
The project was developed with Node.js 24.14.1, which is recorded in the repository's .nvmrc. If you use nvm, run nvm install and nvm use from the repository root.
1. Test Runner and Assertion Library
Full example: Step 1: Test runner and assertion library.
Let's begin with a pure JavaScript function that adds two numbers. A pure function's output depends only on its inputs, and calling it does not produce side effects. To test, we'll call the function and compare its result with what we expected.
In simple-add.js:
export default function simpleAdd(x, y) {
  return x + y;
}
Who Runs the Test, and Who Checks the Result?
A test runner finds the test, groups them into suites, executes them and reports their results.
An assertion library checks whether an observed result meets an expectation. Those responsibilities are often packaged together, but they can also come from separate tools.
Our simple-add.test.js uses the runner and assertions built into Node:
import { describe, it } from "node:test";
import assert from "node:assert";
import simpleAdd from "./simple-add.js";

describe("simple add", () => {
  it("adds two numbers correctly", () => {
    assert.strictEqual(simpleAdd(1, 2), 3);
  });
});
The runner invokes the callback registered by it. Inside that callback, strictEqual compares the value returned by simpleAdd(1, 2) with 3. If they differ, the assertion throws. The runner captures that error and reports which test failed.
Running the Test
The relevant fields in package.json are:
{
  "type": "module",
  "scripts": {
    "test": "node --test"
  }
}
"type": "module" tells Node to interpret the .js files as ECMAScript modules, allowing us to use import and export. We'll discuss this more in step 3.
Run the test:
cd 1-test-runner-and-assertion-library
npm test
cd ..
We can now execute a test, evaluate its result, and report the outcome without installing any dependencies. The next example asks more of the environment.
2. Browser APIs in a Node Test Environment
Full example: Step 2: Browser APIs.
Our next goal is to test a counter made with vanilla JavaScript. It has two buttons and a display showing the current count.
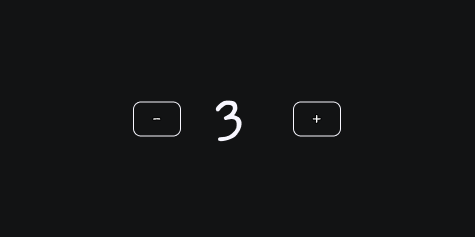
In a browser, the DOM represents the page and provides methods for creating and changing its elements. Our counter uses those methods to display a value and respond to clicks.
Node does not provide a DOM by default, so we need to supply one.
Give the Code the APIs It Expects
We keep node:test and node:assert, and add jsdom. Creating a JSDOM instance gives us a browser-like window with a document:
import { JSDOM } from "jsdom";

const domEnvironment = new JSDOM();
globalThis.window = domEnvironment.window;
globalThis.document = domEnvironment.window.document;
Assigning these objects to globalThis makes them available where the application would normally expect the browser to provide them. Installing the package alone would not do this; we have to create the environment and expose its APIs.
Render the Counter
The counter creates an element, adds its markup, and attaches event listeners. Here is the implementation from counter.js:
const counterMarkup = `
  <span id="count" aria-label="count">0</span>
  <button type="button" aria-label="decrement">-</button>
  <button type="button" aria-label="increment">+</button>
`;

export default function renderCounter(container) {
  const counter = document.createElement("div");
  counter.innerHTML = counterMarkup;

  const countDisplay = counter.querySelector("#count");
  const decrementButton = counter.querySelector('[aria-label="decrement"]');
  const incrementButton = counter.querySelector('[aria-label="increment"]');

  const changeCount = (amount) => {
    const currentValue = Number(countDisplay.textContent);
    countDisplay.textContent = String(currentValue + amount);
  };

  decrementButton.addEventListener("click", () => changeCount(-1));
  incrementButton.addEventListener("click", () => changeCount(1));

  container.append(counter);
  return counter;
}
Here, rendering means creating and inserting DOM elements. jsdom does not calculate their visual layout or draw them on screen.
Test Through the DOM
This excerpt from test/counter.test.js combines the environment setup with a test for the increment button:
import { test, beforeEach } from "node:test";
import assert from "node:assert/strict";
import { JSDOM } from "jsdom";
import renderCounter from "../counter.js";

const domEnvironment = new JSDOM();
globalThis.window = domEnvironment.window;
globalThis.document = domEnvironment.window.document;

beforeEach(() => {
  document.body.replaceChildren();
  renderCounter(document.body);
});

test("clicking increment adds one", () => {
  document.querySelector('[aria-label="increment"]').click();

  assert.strictEqual(document.getElementById("count").textContent, "1");
});
Before each test, we remove the previous elements and create a new counter with fresh event listeners. This prevents a click in one test from changing the starting count in another.
The test locates the increment button, dispatches a click, and checks the resulting text. Here's how you can run the test:
cd 2-browser-apis
npm ci
npm test
cd ..
What This Environment Can Tell Us
The passing tests show that our code can create DOM elements and respond to events while running in Node. They do not tell us whether the counter looks correct in a browser. It's worth noting that while jsdom implements many web standards it does not provide every browser API or perform visual rendering.
This manual setup is deliberately small. A test framework's jsdom environment handles more globals, isolation, and cleanup for us. We will use one in step 4. For now, setting it up ourselves makes the dependency on the DOM visible.
3. Source Transformation and Module Resolution
Full example: Step 3: Source transformation and module resolution.
Our next goal is to test a password validator written in TypeScript. This validator only has two rules: the password must contain at least seven characters and at least one special character. The checks live in helpers.ts:
export const isRequiredLength = (password: string) => {
  return password.length >= 7;
};

export const hasSpecialCharacter = (password: string) => {
  return /[^A-Za-z0-9\s]/.test(password);
};
The validator in validate-password.ts imports them:
import {
  hasSpecialCharacter,
  isRequiredLength,
} from "./helpers.js";

export default function validatePassword(password: string) {
  return isRequiredLength(password) && hasSpecialCharacter(password);
}
There are two things to account for here. The parameter has a TypeScript type annotation, and the function depends on another module. We need executable JavaScript whose imports the runtime can resolve.
Follow the Code to Execution
We compile both the source and tests before running them:
TypeScript source and tests
          ↓
   TypeScript compiler
          ↓
 JavaScript in dist
          ↓
    Node test runner
Compiling separately is a deliberate choice for this exercise. It lets us type-check the code, apply tsconfig.json, and inspect exactly what Node will execute.
The compiler removes the type annotation. For example, the function in the generated dist/validate-password.js looks like this:
export default function validatePassword(password) {
  return isRequiredLength(password) && hasSpecialCharacter(password);
}
This is source transformation: changing the source into code the runtime can execute. We will use the same idea to transform JSX in the React example.
Module Format and Module Resolution Are Different Jobs
The module format determines how a file expresses its imports and exports. The two dominating formats are ECMAScript modules (ESM), with import and export, and CommonJS, with require and module.exports.
On the other hand, Module resolution determines which file or package an import refers to. Even after the runtime understands an import statement, it still needs to find the module named by "./helpers.js".
This step's package.json contains these fields:
{
  "type": "module",
  "scripts": {
    "build": "tsc",
    "test": "node --test \"dist/**/*.test.js\""
  }
}
The TypeScript configuration is:
{
  "compilerOptions": {
    "module": "nodenext",
    "moduleResolution": "nodenext",
    "outDir": "./dist",
    "types": ["node"]
  }
}
module: "nodenext" models Node's module system. For the ordinary .ts files used here, it consults the nearest package.json to decide how to emit modules. Because the package declares "type": "module", the generated JavaScript keeps its ESM imports and exports.
moduleResolution: "nodenext" tells TypeScript which rules to use when type checking and resolving imports. outDir places the generated files in dist, and types: ["node"] supplies declarations for the Node APIs used by our tests.
Why Import a .js File From TypeScript?
Our source file is named helpers.ts, but the validator imports "./helpers.js". With nodenext resolution, TypeScript associates that import with helpers.ts while checking the source. It preserves "./helpers.js" in the emitted JavaScript, where Node resolves it to dist/helpers.js.
The extension is written for the file Node will load. The compiler and runtime see different files, but the import makes sense to both.
Run the Validator Tests
For this chapter we will continue to use Node's runner and assertions. This excerpt from test/validate-password.test.ts covers a valid password and one without a special character:
import validatePassword from "../validate-password.js";
import { describe, it } from "node:test";
import assert from "node:assert";

describe("validate password", () => {
  it("passes - a valid string", () => {
    assert.strictEqual(validatePassword("abcd!fg"), true);
  });

  it("fails - no special character", () => {
    assert.strictEqual(validatePassword("abcdefg"), false);
  });
});
Install the dependencies, compile, and run the generated tests:
cd 3-transformation-and-module-resolution
npm ci
npm run build
npm test
cd ..
Open this step's dist directory after the build. Notice that it contains JavaScript versions of both the application files and the tests. The test runner loads those generated files.
What Happens When We Deliberately Break the Agreement?
To see why the resolution settings matter, make the following changes:
-
In
tsconfig.json, change the two module options to model a bundler:{ "module": "esnext", "moduleResolution": "bundler" } -
Remove the
.jsextensions from the relative imports invalidate-password.tsandtest/validate-password.test.ts:// validate-password.ts import { hasSpecialCharacter, isRequiredLength } from "./helpers"; // test/validate-password.test.ts import validatePassword from "../validate-password"; -
Run
npm run build. Compilation succeeds because bundler resolution accepts extensionless relative imports. -
Open
dist/test/validate-password.test.js. The generated import is still extensionless:import validatePassword from "../validate-password"; -
Run
npm test. Node cannot resolve this relative ESM import, so the test process fails with an error like:Error [ERR_MODULE_NOT_FOUND]: Cannot find module '.../dist/validate-password'
TypeScript accepted the source because we told it a bundler would resolve the imports. But no bundler processed the generated files; Node loaded them directly and applied its own rules.
Changing moduleResolution changes what TypeScript accepts while checking the source. It does not change Node's resolver or add extensions to the generated imports.
Before moving on, restore module and moduleResolution to nodenext, and put .js back on both relative imports. Rebuild to replace the broken output, then rerun the tests:
npm run build
npm test
cd ..
4. Testing React Components With Jest
Full example: Step 4: React components with Jest.
Our final goal is to test a React tabs component. It uses TypeScript, JSX, imports from several files, and DOM events, so it brings together all of the responsibilities we have explored.
The Component We Want to Test
The component displays four tabs named after Danish composers. Selecting a tab changes the panel shown below it. Here is an excerpt from component/example-components.tsx, showing the first tab and its panel:
export function DanishComposersTabs() {
  const [selectedTab, setSelectedTab] = useState("tab-1");
  const isSelected = (tabId: string) => selectedTab === tabId;

  return (
    <Tabs>
      <h3 id="tablist-1">Danish Composers</h3>

      <TabsHeader aria-labelledby="tablist-1">
        <TabTrigger
          id="tab-1"
          type="button"
          aria-selected={isSelected("tab-1")}
          aria-controls="tabpanel-1"
          tabIndex={isSelected("tab-1") ? 0 : -1}
          onClick={() => setSelectedTab("tab-1")}
        >
          Maria Ahlefeldt
        </TabTrigger>
        {/* Three more tabs */}
      </TabsHeader>

      <TabsPanel
        id="tabpanel-1"
        tabIndex={0}
        aria-labelledby="tab-1"
        hidden={!isSelected("tab-1")}
      >
        {/* Composer biography */}
      </TabsPanel>
      {/* Three more panels */}
    </Tabs>
  );
}
The small wrapper components supply the tablist, tab, and tabpanel roles. aria-selected exposes which tab is selected, while aria-controls and aria-labelledby connect each tab to its panel. The complete component includes the imports, all four tabs, and their content.
How the Tools Fit Together
The path from source code to a running component test is:
TypeScript and TSX source and tests
               ↓
       TypeScript compiler
               ↓
    CommonJS JavaScript in dist
               ↓
 Jest running in Node with jsdom
               ↓
 React Testing Library and user-event
 render, query, and interact with the UI
Each tool has a job:
- Jest runs the tests, provides assertions, and reports the results.
- TypeScript checks the source and imports, removes types, transforms JSX, and emits modules.
- jest-environment-jsdom supplies the DOM APIs used by the component.
- React Testing Library renders the component and queries the resulting document.
- user-event simulates interactions such as clicking a tab.
Transform TypeScript and JSX
The tsconfig.json builds on step 3:
{
  "compilerOptions": {
    "jsx": "react-jsx",
    "module": "nodenext",
    "moduleResolution": "nodenext",
    "outDir": "./dist",
    "types": ["node", "react"]
  }
}
The new jsx: "react-jsx" setting transforms JSX into calls to React's JSX runtime. A test written as render(<DanishComposersTabs />) becomes ordinary JavaScript function calls. Jest receives that generated JavaScript.
This step's package declares "type": "commonjs". With module: "nodenext", TypeScript therefore transforms the source imports and exports into CommonJS require calls and exports assignments. We use that output so Jest can load the tests without additional ESM configuration.
The source still imports local files with .js extensions. For example:
import { DanishComposersTabs } from "../component/example-components.js";
TypeScript checks that import against example-components.tsx and preserves the .js path in the generated require call. At runtime, it refers to the compiled file in dist/component.
Tell Jest What to Run
The project's jest.config.json makes the arrangement explicit:
{
  "testEnvironment": "jsdom",
  "testMatch": ["<rootDir>/dist/**/*.test.js"],
  "transform": {}
}
testEnvironment selects the installed jest-environment-jsdom package, which handles the browser-like globals we previously assigned ourselves. testMatch directs Jest to the compiled tests in dist. The empty transform object disables Jest's transformation step because TypeScript has already done that work.
The package keeps building and testing as separate commands:
{
  "type": "commonjs",
  "scripts": {
    "build": "tsc",
    "test": "jest"
  }
}
After editing a .ts or .tsx file, rebuild before running the tests so Jest sees the new code.
Render, Query, and Interact
The test suite imports render and screen from React Testing Library, and userEvent from its companion package. Here are two tests from test/example-components.test.tsx:
import { describe, expect, it } from "@jest/globals";
import { render, screen } from "@testing-library/react";
import userEvent from "@testing-library/user-event";
import { DanishComposersTabs } from "../component/example-components.js";

describe("DanishComposersTabs", () => {
  it("renders the Danish composers tablist", () => {
    render(<DanishComposersTabs />);

    screen.getByRole("tablist", { name: "Danish Composers" });
    expect(screen.getAllByRole("tab")).toHaveLength(4);
  });

  it("selects a tab when it is clicked", async () => {
    const user = userEvent.setup();
    render(<DanishComposersTabs />);

    await user.click(screen.getByRole("tab", { name: "Carl Andersen" }));

    screen.getByRole("tab", {
      name: "Carl Andersen",
      selected: true,
    });
    screen.getByRole("tabpanel", { name: "Carl Andersen" });
    expect(
      screen.queryByRole("tabpanel", { name: "Maria Ahlefeldt" })
    ).toBeNull();
  });
});
render mounts the component into jsdom's document. getByRole finds elements using their semantic role and accessible name, so the test describes a named tab rather than depending on a CSS class.
When we await the click, the component's event handler updates React state and the DOM changes. The queries then check for the selected tab and its panel. A getByRole query throws if it cannot find a matching element, which makes the test fail.
The final assertion checks that the previous panel is no longer exposed by the role query. The component hides that panel using hidden; it does not remove it from the DOM. This distinction matters when interpreting what the test proves.
The full suite also checks the initial selection and the attributes linking each tab to its panel. Run it with:
cd 4-react-with-jest
npm ci
npm run build
npm test
cd ..
A passing suite shows that the compiler, module loader, DOM implementation, and test utilities work together for this component. The test still runs in Node, and the interactions and assertions concern the DOM rather than pixels on a screen.
Conclusion
Building a testing setup helps us understand how UI applications run. We can follow the code from source files to executable JavaScript, see how its modules are loaded, and identify the APIs it expects the environment to provide.
That understanding also gives us a place to start when a setup fails. A missing document points us toward the test environment. A syntax error may mean a transformation step was missed. An import error gives us a reason to inspect the generated modules. Working through small examples makes these connections easier to see when we encounter them in a larger application.